I drew the plans and provided much of the labor myself, providing a cost saving of around 50%
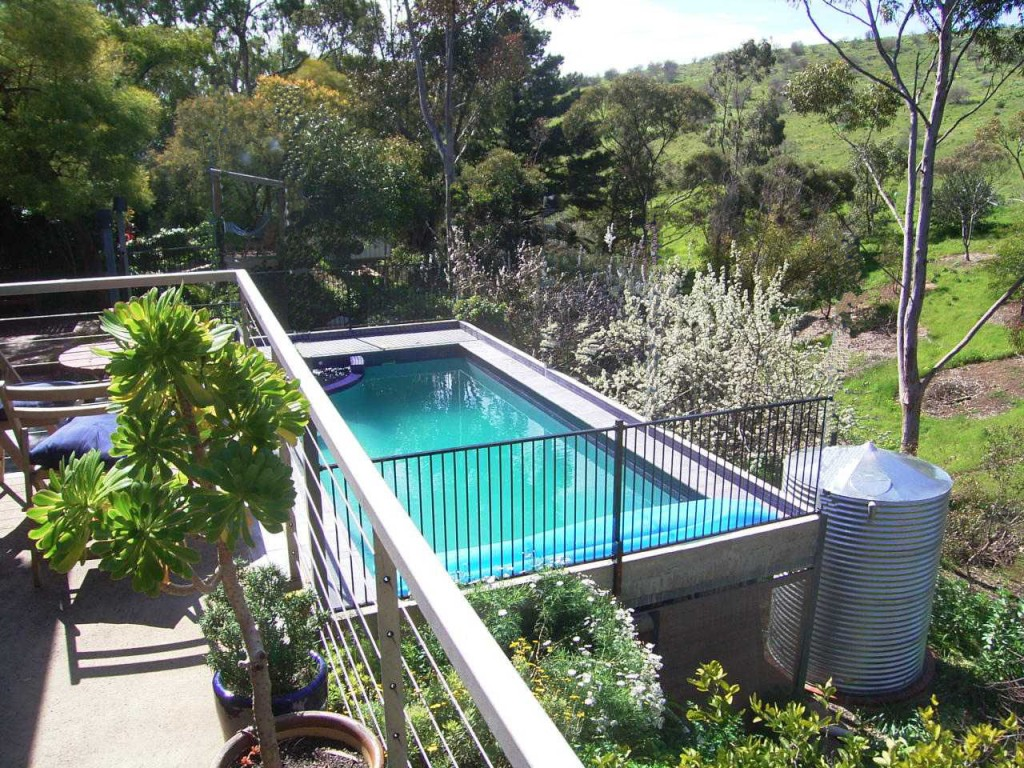
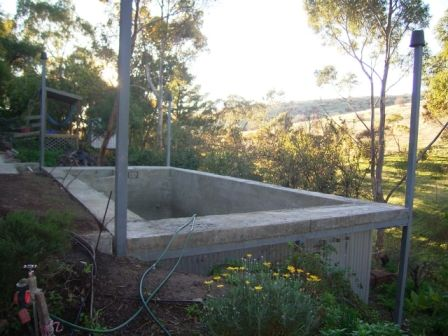
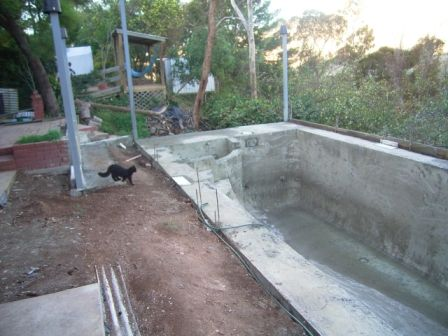
This Swimming Pool designed by Grant Lucas Architect is situated on a hill with a 1 in 3 fall. The site is tiered and over 50 stairs have to be negotiated from the street. Due to the difficulty of site access all materials had to be carried in by hand. The site was also excavated by hand. Provision for a fully enclosed glazed structure around the pool complicated the build by imposing additional structural requirements.
I designed a concrete shell as this could be used as footings for the room over. The structural Engineer advised to found the pool on natural ground. This advice meant that some structural savings could be made. Instead of having to use piers, a series of strip footings could be used to key the pool into the hillside. By following this concept the design of the pool became what is known in the industry as a “split level pool.” This means that the depth increases from side to side rather than end to end. This has the advantage of giving a fairly continuous depth swimming lane for the entire length of the pool.
There were serious space constraints due to the existing house and garden layout, and an existing sewer easement at the rear of the property that had to be avoided. The room over is still under construction.
If you live in Adelaide and are thinking of putting in a pool or pool enclosure – email grantluc@grantlucasarchitect.com.au I will make sure your pool suits your site and integrates into your garden.
Architectural Design input will help Integrate a pool into the Landscape… consider the whole site and House, not just the pool
An Architect designed pool is the difference between a suit off the rack or one tailor made….. and the best bit is that if you have your own plans you can shop around for the best price.
POOL SPECIFICATIONS
Pool Type: Spray Concrete shell – half in ground
Pool Fitout: Tiled spa & spill-edge, swimjets
Pool Finish: Qpebble (blue) and tiles
PoolCoping: 500×500 Quantum stone (grey)
PoolSize: 8.8m x 3.8m x 2.2 deep
Pool RoomSize: 11m x4.9mplus entry plus breezway
CONSTRUCTION TIME-LINE
June 2008: Building Approval
November 2008: Footings Poured
March 2009: Shell form-work and Reinforcement
April 2009: Concrete Sprayed
December 2009:Filled
March 2010: Epoxy paint to enclosure over finished
POOL CONSTRUCTION SEQUENCE
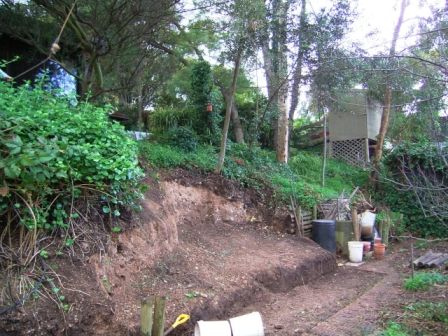
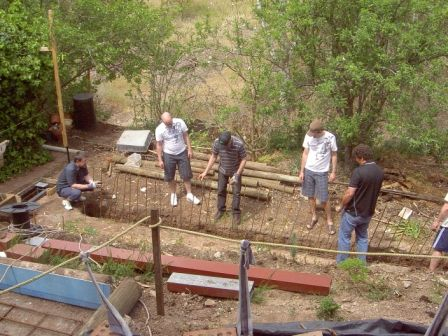
SITE PREPARATION
Preliminary Siteworks were required above the pool to divert water away from the digging
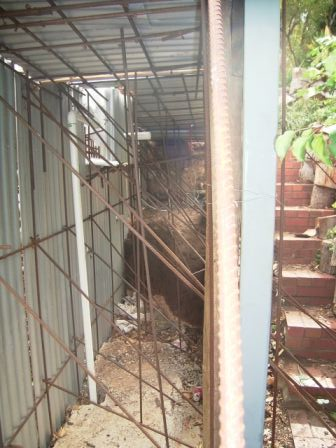
Excavation begins. Poor site access meant this was all done by hand….a long process with a pick and shove
Six small trees had to be removed to clear the site
Be Green. Waste nothing! One large tree unfortunately had to go. It was an Alepo Pine, so technically almost a weed. Permission was obtained from council for its removal and a specialist climber hired to fell it. I purchased a chain saw and cut up the logs which are to be used as Firewood. These can be seen stacked in the backgound
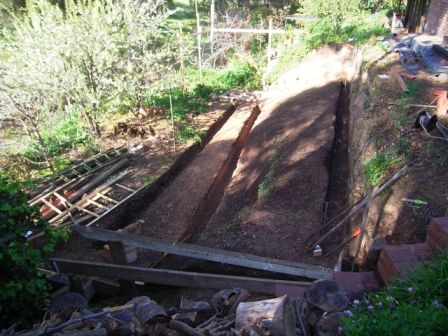
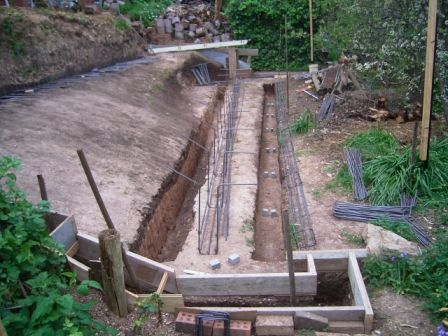
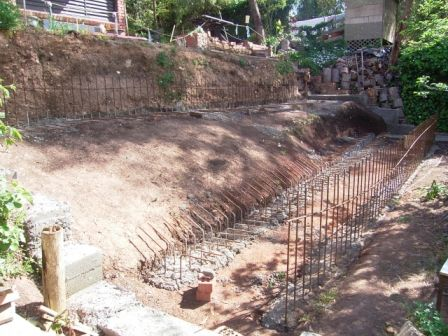
FOOTING CONSTRUCTION
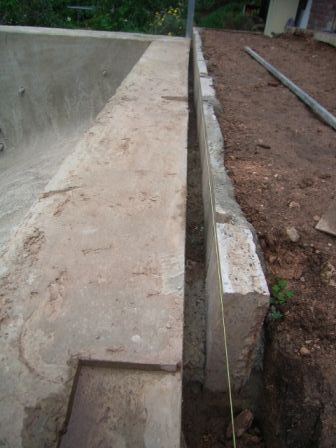
The footing trenches can be seen here. These are to key the concrete shell into the slope and stop the pool from moving down the hill
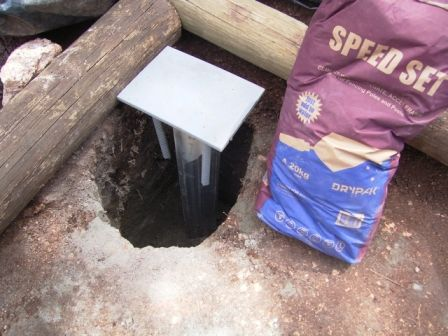
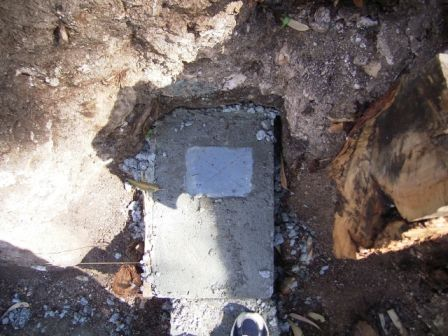
Base-plates needed to be set in place as fixing points for the columns to the proposed pool enclosure. This is a column to the pool entry area. As this was on the high side of the pool the ground was fill from the original cut and fill when the house was built. To ensure the baseplate was in the correct location it was welded onto a small stub column to transfer the loads below natural ground and some speedset was used to set it in position
All the reinforcing had to be carried in by hand. I drew up the shapes I needed, did a take-off and faxed the order through. I used Bianco for the steel. They were competitive in price and had prompt delivery
My mates helping me get the reinforcement in place. These were long deep trenches and lots of manpower was needed to get everything in place
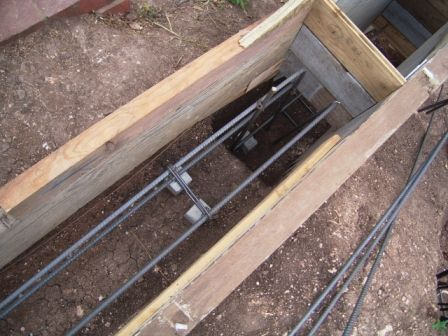
Close-up of the top strip footing. The bars sticking out will be used to tie the main shell reinforcing and the strip footing together
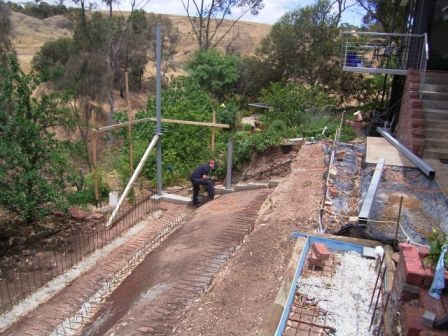
Shell Reinforcing in place. Note the form-work in the foreground. This was required for an additional strip footing that ties into the pool footings providing a firm base for the columns of the future pool enclosure
The stepped strip footing form-work at a step, showing the y12 steel in place
The stepped strip footing. A mirror image footing to this is on the other end of the pool
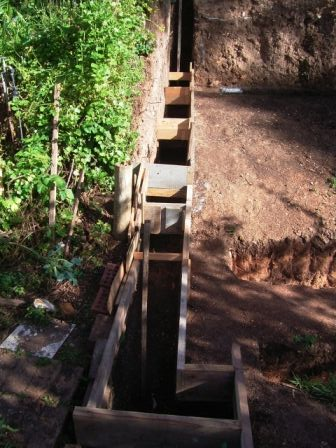
Pool strip footing after concrete pour. The concrete for the longditudinal footings had to he roughened on the top to key better into the concrete shell when it is poured. The steel shown exposed is used to tie into the shell reinforcing and keep it up off the soil
The stepped footing showing a base-plate for one of the columns after the concrete pour. These plates provide welding points for the columns and allow greater tolerances than hold down bolts
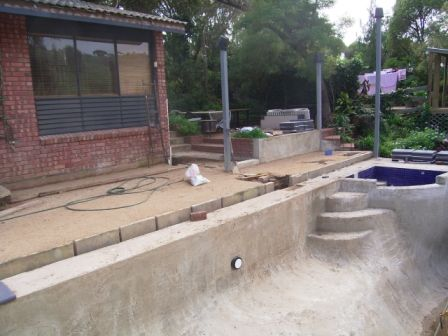
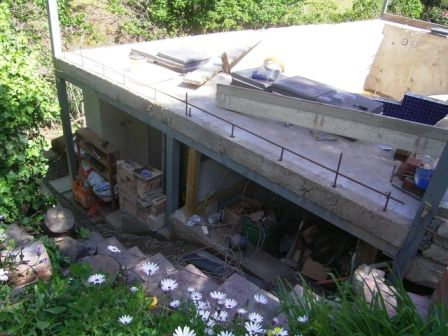
The pool site shown in entirity after the footing concrete pour. Welding to fix the columns has started. Note the small slab at the top. Always prepare a spot for the truck to get rid of the extra concrete otherwise you will have to dump it. This slab was finished during the shell pour and forms the toe of a concrete retaining wall holding back the brick patio above
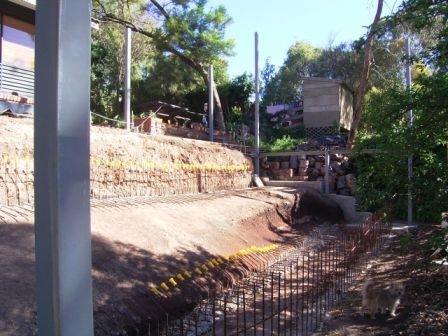
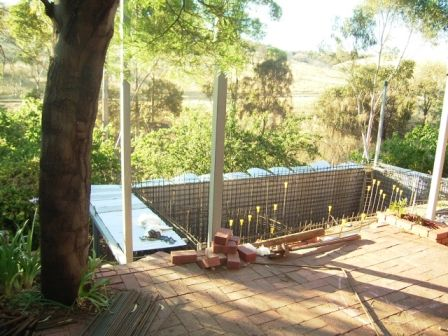
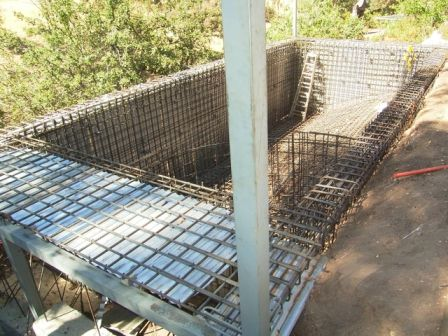
Overview of pool site showing steel columns and beam
Overview of pool site. Note the plastic yellow safety ends now placed on the reinforcing
SHELL FORMWORK
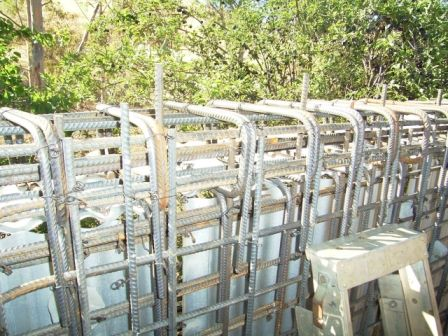
The form-work used for the pool was good quality second hand corrugated roofing iron
The corrugated iron form-work was held in place by a series of y12 reinforcing rods bent and tied together to brace the structure during the concrete spraying. When finished this provides a surprisingly strong structure and is a cheap solution. If possible have another place you can use this reinforcing in at the end of the job as about $1000 of rods was used just as bracing
The pool form-work shown with the edge boards in place ready to spray. The edge-beam for this pool was thickened horizontally to enable a good width for walking around the pool once the room is built. This cantilevers past the edge of the concrete walls and complicated the form-work greatly
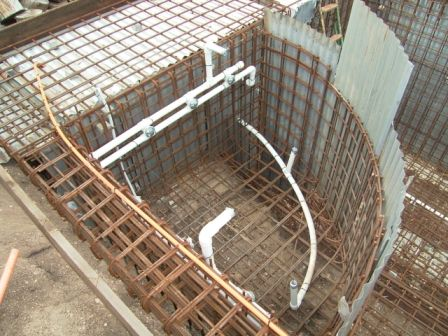
THE SHELL AND RING BEAM STEELWORK
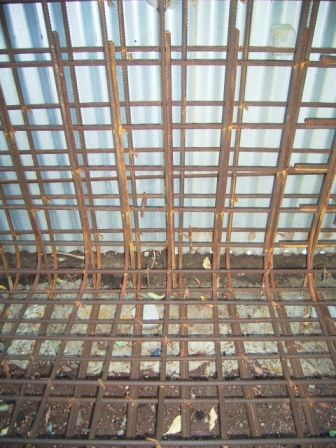
Showing the Pool form-work before the edge beam reinforcing is tied in
Pool form-work with The edge beam reinforcing in place but before the edge form boards are placed
Close-up of the pool reinforcing at the junction of wall and floor showing ligatures between the two layers of reinforcing just above the bend
Close-up of the pool edge-beam reinforcing
A light rusting had started before the concrete was placed. The concrete has to be placed before this gets too progressed. Note The vacuum cleaner at the base of the pool. The surface of the pool has to be kept clean of leaves and other debris and the strip footings have to be kept free of dirt otherwise they will not bond with the shell when poured
The second fix preliminary plumbing is now placed. The long length of pipe from the main drain to the edge of the pool was placed underground before the form-work started as it would be impossible once the reinforcing was placed
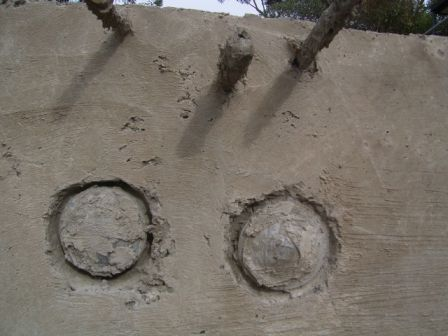
Pool plumbing. The skimmer box need a space allowance when placing the form-work. A 600 x 600 void should be adequate
The skimmer box from underneath. Note the edge beam is elongated greatly at one end of the pool, forming a deck to allow space for diving into the pool. This will provide ample space for a plant room under
The spa showing reinforcing and plumbing. Note 2 suction inlets at the bottom of the pool to comply with safety regulations. Once the plumbing is placed I bent up reinforcing to form the shape of the seat. This is not a structural requirement but helps eliminate shrinkage cracks between the seat and shell and gives the concreter a template to guide his concrete placement. I did the same for the concrete steps into the pool
THE CONCRETE POUR / SPRAY
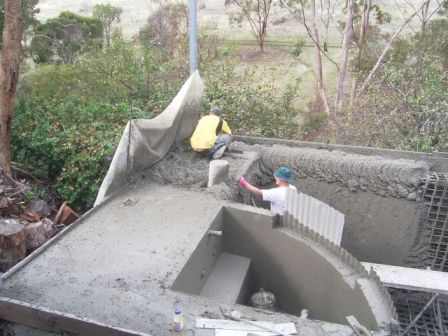
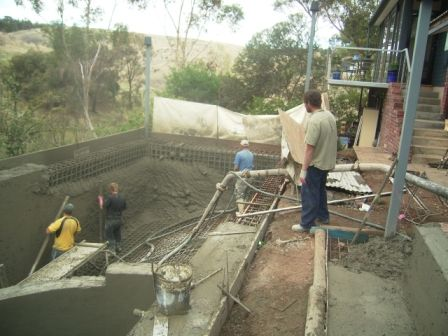
The spray concrete being placed. The spa is the trickiest and so is commenced first
Pool being sprayed with concrete. A concrete pump was used to bring in the mix. Note the drop-sheets to stop over-spray. The foreground shows the freshly sprayed concrete retaining wall between the pool area and patio above
Once the pools concrete shell is finished 21 days of curing followed. Early winter rains helped
SERVICE PENETRATIONS AND DETAIL
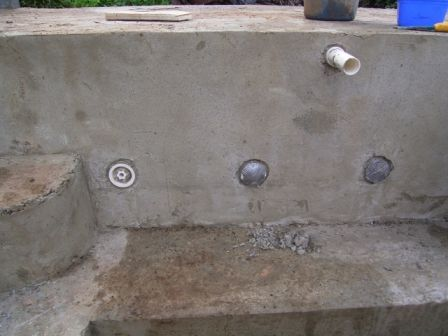
The pools plumbing penetrations including these swim-jet housings were covered in duct tape before the spray
Showing cleaning of the plumbing penetrations underway. 16 hours were spent preparing and sealing the penetrations. A groove was placed around each pipe (form with a finger) when the concrete was wet. A 2 part epoxy putty mix (Ferropre) was used to seal between the pipework and the concrete
The main drain showing ferropre sealant. I had to angle grind around the area first to prepare the pipe
Each of the four corners of the shell had reinforcing showing above the surface of the finished concrete. This was used to tie the piano wire used as gauge lines for the concreters. I ground these down to 15mm below the surface of the shell and used a 2 part Epoxy sealant(Megapoxy H)to cover the area to stop future rust problems
Concrete pool shell showing corrugated steel lostformwork retained on the sides. The corrugated steel under the cantelevering edges was stripped away to enable rendering
Concrete pool shell just after curing and I have almost finished stripping off the form boards to the edges. Note the white patch on the form-board is an “L” shaped timber form that I had placed around the edge beam to provide set-downs where future column base-plates are to be fixed. Any steel exposed (as in foreground) that could not be removed was cut off and ground below the concrete surface and covered with epoxy
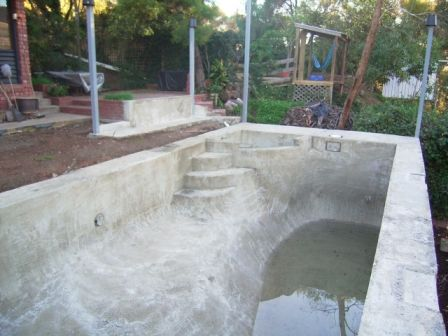
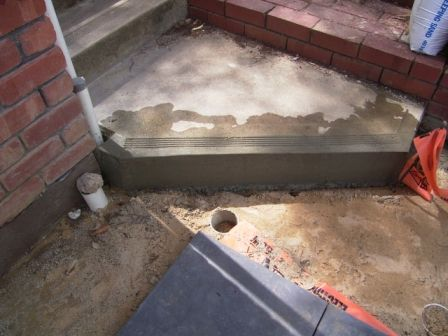
The pool shell showing the wedding cake steps. Also note the set-downs in the edge beam for the future column base-plates
Close-up of a set-down in the edge beam
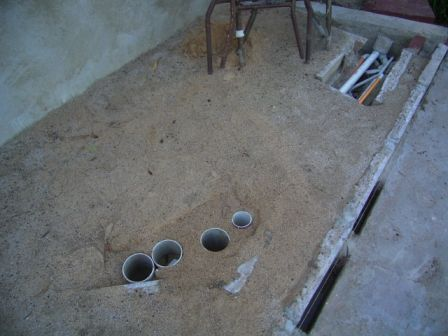
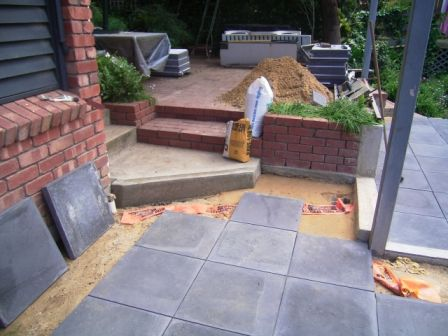
Quarry sand was used under the pavers between the pool and the house. This shows the service run for the solar hot water between the pool and the house. I used recycled cement paving on edge and sections of storm-water pipe as inspection points at all of joints in my pipework so visual inspection would be possible at a later date if I had a leak
THE FITOUT
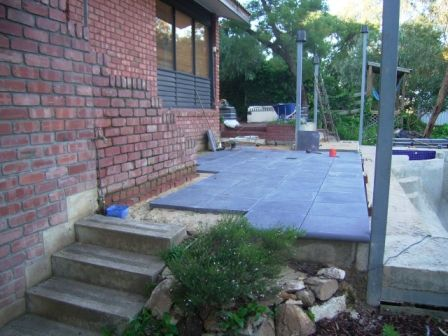
Recycled concrete paving: I removed the existing path at the back of the house with a concrete saw and stood the pieces on edge to provide a small retaining wall at the edge of the pool and hold back the paving sand.
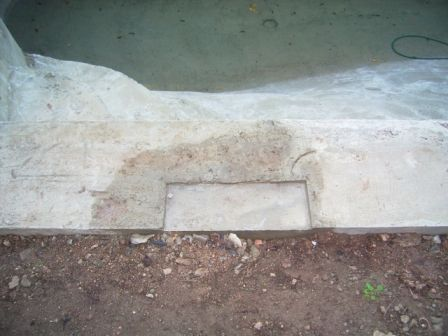
The existing monolithic paving around the house was removed between the pool and the house to reduce the feeling of clutter and make the space cohesive. Note I recycled these pieces of concrete by standing them on edge, forming a small retaining wall (the pool is 1 step below the patio) which also provided point to mortar the edges of the new concrete pavers to. Note the 50mm space between the pool edge and the concrete. The formboards had bowed in and the pool edge was not straight. The coping tiles will hide this
Solar pipes between the house and pool. One up to the roof and one back from the roof plus a conduit for a 12 volt temperature sensor cable. Note I have cut away the existing cement paving around the house to provide easy cable access. The finished unit paving level is to be one step below the existing monolithic paving level. This fixes a fault with the existing house where the existing paving was above the damp-course
Paving almost finished. Cuts were left until last to save on machine hire time. I hired a large table brick saw and did all the cuts in one day
The paving showing the level changes from the existing concrete
Note The bullnose edge for the pavers in the foreground. This is to be inside the pool room enclosure and so will become a step. The pavers beyond will be outside the room and therefore needed no special edge treatment
I finished off the edge of the cut concrete with 75mm of new concrete and tooled in grooves to match the existing stairs. To ensure the new and old stuck together properly I used steel dowels and 3 coats of Chemstick to the existing face
I rendered the existing footing to provide a clean look. The existing footing was very irregular. I was careful to leave a 15mm “V” joint between the brick and the new mortar. If covered over white-ants may find an oportunity to get under the mortar and find ingress to the house
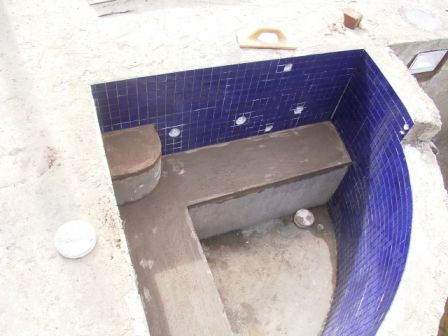
Tiling the pool. Note the tiles are laid and then the next day the step and seat was mortared up to a full tile level
Once the inside was finished I mortared the spa edge to the correct thickness and height
One of the column base-plates in position. Note the cantilever on the base-plate due to the pool edge not being in the correct position. Additional monolithic concrete was poured under after the base-plates bolts were epoxied into position. Hilti HAS HVU system epoxy system with stainless steel hold-down bolts were used as seen in background. The base-plate had megapoxy H mixed with sand to form a flowable grout placed under it
Another base-plate to be fixed on the far pool edge
I formed a concrete hob around the edge of the pool
THE EDGE-BEAM HOB
I drilled into the edge beam and fitted steel dowels to strengthen the hob
This hammer drill and 20mm masonry bit from Bunnings did a great job. Together they cost $100
THE TILES AND SKIM COAT PLASTER
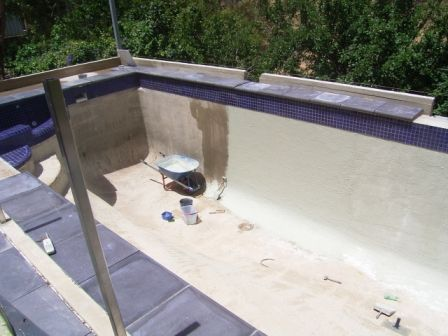
I had to place an acrylic skim coat over the concrete shell as a prep for the plasterers. This keys the Qpebble to the shell and provides an constant substrate so the Qpebble colour does not look patchy. Thoroughly wetting the shell down is a requirement to get the skim coat to set properly. I applied a broom finish with a banister brush
Form-work for the hob in the background. This was tricky due to the fact the outside board was 2.5m above the ground. Note that on this side of the pool the hob is formed in 3 separate pieces as I had to leave spaces at the column base-plate
My plan included a section of stainless steel posts with glass balustrade. Before I formed up the section of hob that this was to be fixed to I had to prepare the reinforcing bars so they would allow the steel posts to be set into the full depth of the hob. Steel twitching tool and ties shown adjacent
THE BALUSTRADE
The swimming pools stainless steel Balustrade posts were set into pockets cast in the hob. I used construction grout, a type of fast setting super strong flowable grout, to fix the post. Wedges held everything in place during setting
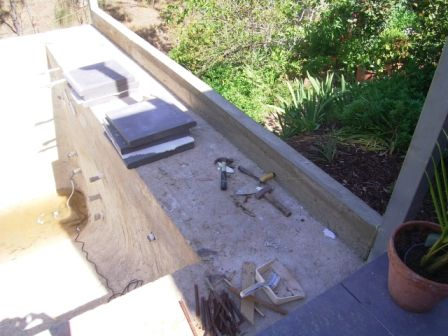
THE POOL EDGE COPING
The string-lines shown here were for setting out the pool coping. I covered up small irregularities in the shell by slightly increasing or decreasing the overhang of the bull-nose edges on each side of the pool to get a line of best fit
Setting out the pool coping involved mitering the point where the bull-nose edges meet and removing the rest of the bull-nose on one tile to form a straight joint
The Pool balustrade was to have a 50mm handrail on 40mm posts. I clamped everything together before pouring the grout around the posts to ensure an easier job for the welder. I got the welder to place the 3 missing steel posts that I had already mounted base-plates for, then the top-rail of the balustrade was welded onto the tops of the balustrade posts and to the steel columns either end
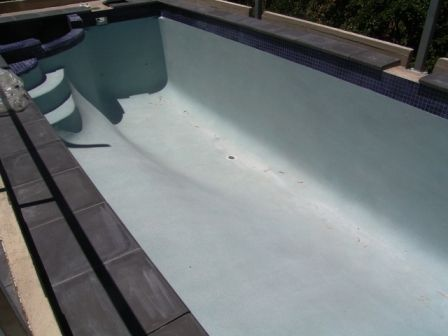
THE Q-QUARTZ PLASTER FINISH
Qpebble render is applied here, but not yet acid washed down. The acid washing further exposes and cleans the aggregate. Qpebble is a modern form of the old fashioned pebblecrete. A smaller aggregate that is 3mm max size is used and the cement matrix has acrylic additives and is coloured to choice. I used this as there have been some problems with some of the newer pool rendering compounds especially when combined with Ioniser sanitising systems
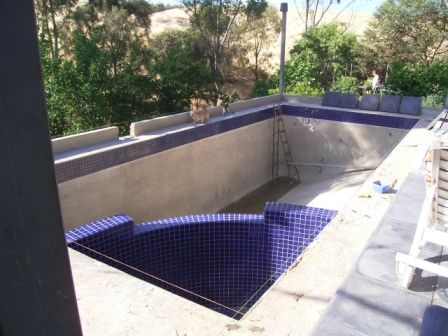
I had 2 days to fix the balustrade before the pool had to be filled. The Qpebble like many render systems cannot be exposed to the atmosphere for any prolonged periods. If the pool is left drained for two long the render will crack and spall
FILLING AND SAFETY
After the acid washing the pool is filled. Note I have temporary mdf panels in the balustrade while I wait on the glass. I took these panels to the glazier and they were used as templates
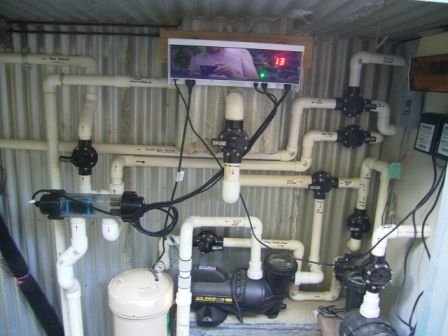
THE FILTRATION AND SANITATION
My pool plantroom was a bit tricky to understand at first as I required many combinations of heating and filtering between both the spa and pool. I carefully labeled each valve and pipes direction of flow. I used an Enviroswim ioniser. Theoretically no further sanitising chemicals are required. 2 Davey Silensor pumps were used one for the solar system and the other for filtration and then spa. The box at the top right hand side is the swimming pool Distribution board. The 2 black boxes under are the transformers for the lights. I have only 2 pool lights, one in the spa and one in the pool. I chose halogen lights as led lights have shown to be unreliable and expensive many breaking down in their first seasons use
FINISHING THE POOL DETAILING
6.38 laminated glass was set in aluminium channel. These channels were fixed to the stainless steel balustrade sections with stainless steel screws
A permapine retaining wall was used against the steel posts supporting the end of the pool. This enabled a new garden bed to be planted that integrates the pool better into the landscape and provides a space against the pool for future plumbing access. The two black objects adjacent the ends of the retaining wall are valves for the swim-jets which are yet to be installed
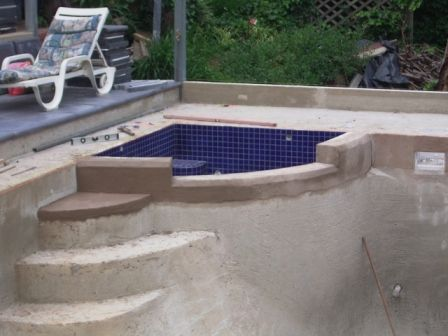
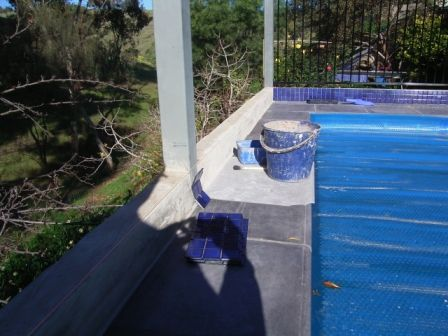
I used an acrylic render on the pool hob to provide a true surface for tiling. Note the solar blanket on the pool. A receipt for a solar blanket is required before the pool can be filled. Sizing your pool to fit a standard solar blankets modular component width will save some money
The pool hob was a module of the tile height. I chose blue tiles and grey grout as these should never date. Slate grey Silicone was used around the columns and between the pool coping joints at strategic locations
Tiling for the back hob was set out from the central columns. This meant I could have 2 full tiles on the column and silicone tile joint either side, as movement would crack any tiles that bridged between the column and concrete hob
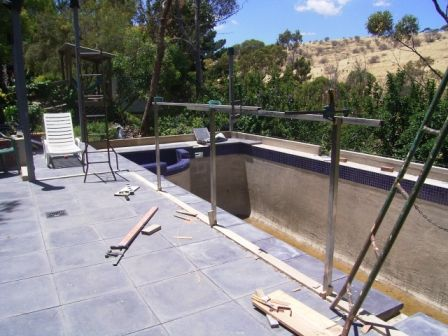
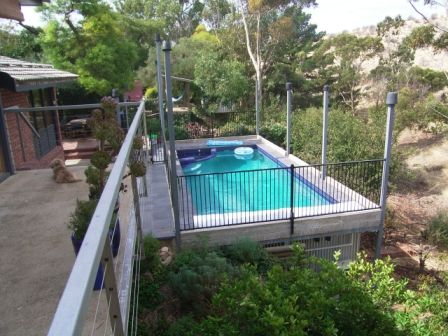
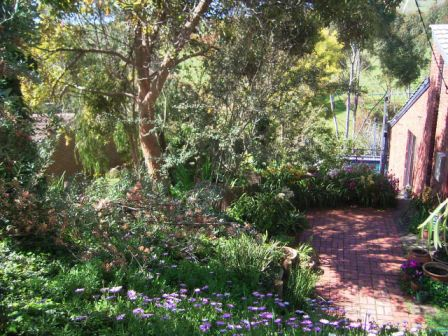
Integrating the pool into the garden is important. A glimpse of the pool in the background entices guests to explore the sequence of 3 small brick patios between the front yard and the poo
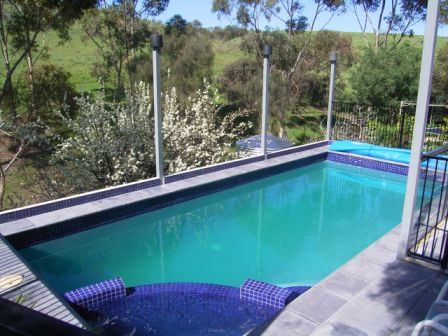
Plum blossom adjacent the pool edge is worth the bother of a few petals in the water. The elevated position of the pool and the surrounding tiled hob stops most debris from dirtying the pool
The pool from the fist floor balcony. Note the 7,000 litre Galvanised Corrugated steel rainwater tank next to the pool. This will help with top-ups during summer
The spa has an adjacent sitting area. When the proposed glazed room enclosing the pool is finished this will be next to the entry door for easy access of the most used part of the pool
The spa and the pool are both heated by a solar pool heater on the second storey roof. Although not optimal in its location (the roof is flat which reduces the amount of solar radiation it recieves) the spa can get to over 40 degrees on a warm day and I had to install an automatic temperature (solar)controller to stop the spa from getting too hot. On a typical day I run the solar return into the spa and use the overflow edge to then fill up the pool. By a series of valves I can isolate the pool from the spa and heat either of them individually or together
THE BREEZEWAY / VERANDAH
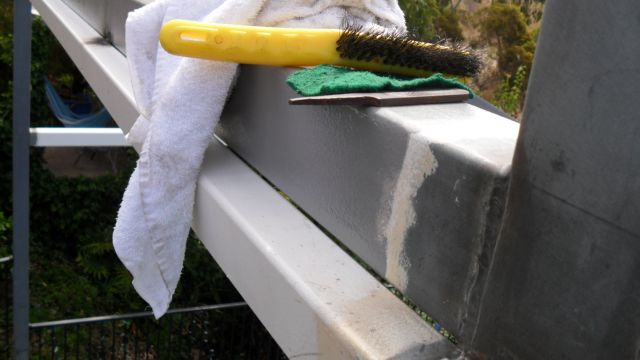
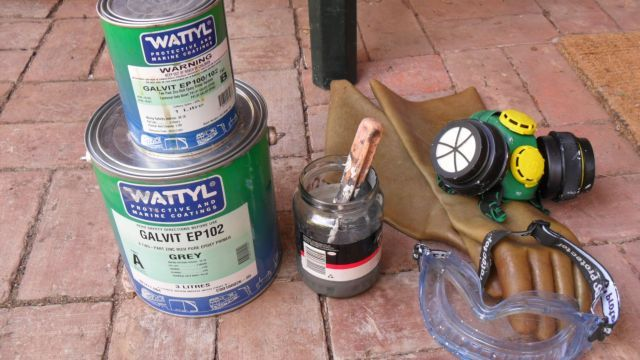
Steel in a corrosive environment such as a swimming pool enclosure needs to be properly protected otherwise corrosion will ruin it within months. This steel was grit blasted and inorganic zinc silicate (grey in foreground)applied in the shop. On site I applied the subsequent coats to the beams with a roller in a wind protected well ventilated open verandah before the steel was lifted in place. 6 coats of epoxy paint were applied. The first 2 of primer (yellow) then 2 build coats (white) then the top coats for the colour and weather protection. The top coat I applied in two slightly different shades to make sure that the second coat was even and nothing missed. The green pad is needed to wash down the inorganic zinc silicate to remove the chalky salts that build up over time. Note that because the frame is welded I stopped the paint short of the ends of the steel beam so that it would not become heat effected and ruined. All joints needed to be ground down and an additional coat of epoxy zinc primer applied before the top six coats could be put on to these joints. This specification is similar to that used on oil rigs. It may seem overkill but it needs to last the life of the structure. Imagine having to paint this again once the roof cladding has been put on! The paint cost around $3000 all up. Wattyl prepared the specification for me. The paint MSDS required me to wear a respirator, goggles & gloves due to the cyanide compounds in the topcoat. The thinners for the two base coats were also quite poisonous and also required full safety gear including respirator. It may be inconvenient and hot but do not try this without the proper equipment. I poisoned myself using an isocyanate containing epoxy clear coat on a parquet floor years ago and can assure you that you do not want to take the risk
A closeup of the box gutter between the house and the steel breezway frame. Folded zincalume was used for the gutter
If box gutters overflow it can cause problems especially if the water gets inside the wall cavity. I used a cheap plastic rain-head with leaf guard and created an air-gap between it and the down-pipe pop above. I get clean water for my tank and if the down-pipe backs up it will not flood back into my gutter. I used a 100mm pop on the gutter to avoid leaf blockages. Once the downpipe and rainhead is painted to match the house it will not look so ugly. Note the pipes for my solar pool heating are next to this downpipe. I have painted them to avoid any brittleness caused by ultraviolet damage. When I finish the project I will put a cover over them to hide them from view
The steel frame of the new pool room requires a special epoxy paint system to avoid corrosion. Wherever the inorganic zinc silicate coating on the posts and beams is compromised by welding it needs to be touched up with an epoxy zinc paint before the top coats can be applied. Respirator and goggles are recommended when applying epoxy paint. I used the wattyl Galvit 100 and 102 part A and B system. This also requires special thinners. The paint can is a 4 lite can but only contains 3 litres of paint so that the smaller part B containers contents (1 litre) can be added. The mixed paint must be used within a few hours so I mixed the two parts in the 3 to 1 ratio in a smaller pot so that I would not waste the entire can. This paint is exceptionally expensive but worth the money if you want a good result
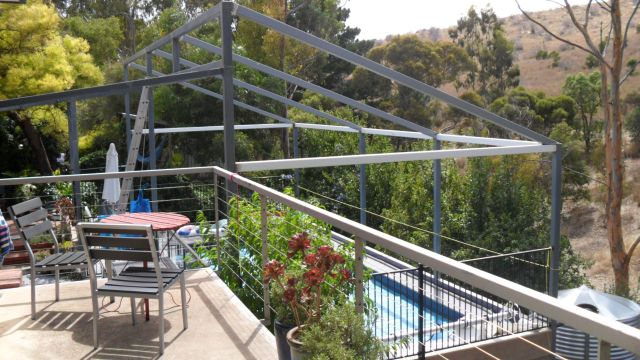
THE POOL ROOF FRAMING
The fully welded steel framing around the pool was put on in early 2012. The next step is to finish the painting. The GFC means I will wait another season before the roof goes on. Glazing the walls is scheduled for 2014
Enviroswim cell maintenance. I have had to remove the oxidising plates from the cell 4 times over the past 3 swimming seasons. I have been informed from the manufacturer that this is a result of my pool chemistry being out of balance, however I have been fairly careful with my water chemistry and see it more a problem of the product. It doesn’t matter that much but I feel that it could be included in the maintenance manual as I have read of several other Enviroswim owners with a similar problem. It is fairly simple to dip the plates in a weak hydrochloric acid solution (about 1 to 10)which cleans them in about half an hour. Note I use goggles when I handle acid. The plates are shown soaking in the background (blue ice-cream container). I cut a plastic bottle of a similar diameter to the plates down to the correct size so that the entire active surface could be cleaned while keeping the lid out of the solution as I didn’t want to damage the electric terminals. I sat the soaking container in an ice-cream container to act as a catchment tray for the excess acid as it foams and bubbles over the edges of the soaking container. Other things to note in this picture are replacement rubber sealing rings for the canister. I used these as the originals had degraded and the ionising chamber was leaking no matter how hard I screwed it on. As my chamber is below pool level I have more constant pressure on the canister. Note the small spiky looking object just to the right of the enviroswim electrodes. This is one the original electrodes after I have unscrewed it from the chamber. After 3 years there was not much left of the electrodes but the system still continued to function even with the electrodes worn down to tiny nubs. I removed them at this point as the maintenance manual explains they must be removed before they fall off
ONGOING SANITATION (ENVIROSWIM) MAINTENANCE
Enviroswim electrode replacement. The ioniser means the pool is as close to fresh-water as any system. The Manufacturer stated the electrodes should last about 18 months. I ran my pool filter with the environswim active for about 6 months a year. I was running it for about 2 hours a day for a couple of the cooler months, abour 6 hours a day for the warm months and around 8 to 10 hours a day in the very hot weather. This was the minimum required to stop the pool going cloudy. All taken into account the 18 months time-frame seems like a reasonably accurate figure. I am however running my filter with the Enviroswim on for a little longer than I had expected from the product literature. This shot is of the replacement electrodes just before I screw them back into the ionising chamber. The replacement electrodes come fixed to stainless steel end bolts which were slightly shorter than the originals and the replacements came with two seating washers unlike the originals which only had one. It was a tight fit to include ever nut and washer (and there are plenty). I noticed the original nuts required a no 10 metric spanner to undo them and the replacements fitted a 7/16th spanner nicely. This slightly larger bolt diameter means that unlike the originals which just slid through the housing cap the replacements needed to be physically screws in and tapped a thread into the plastic as they did. This means a tighter fit and presumably is more watertight, but I will be curious to see how easy it is to remove in 3 years time as even the old one required a bit of force to extract it from the lid
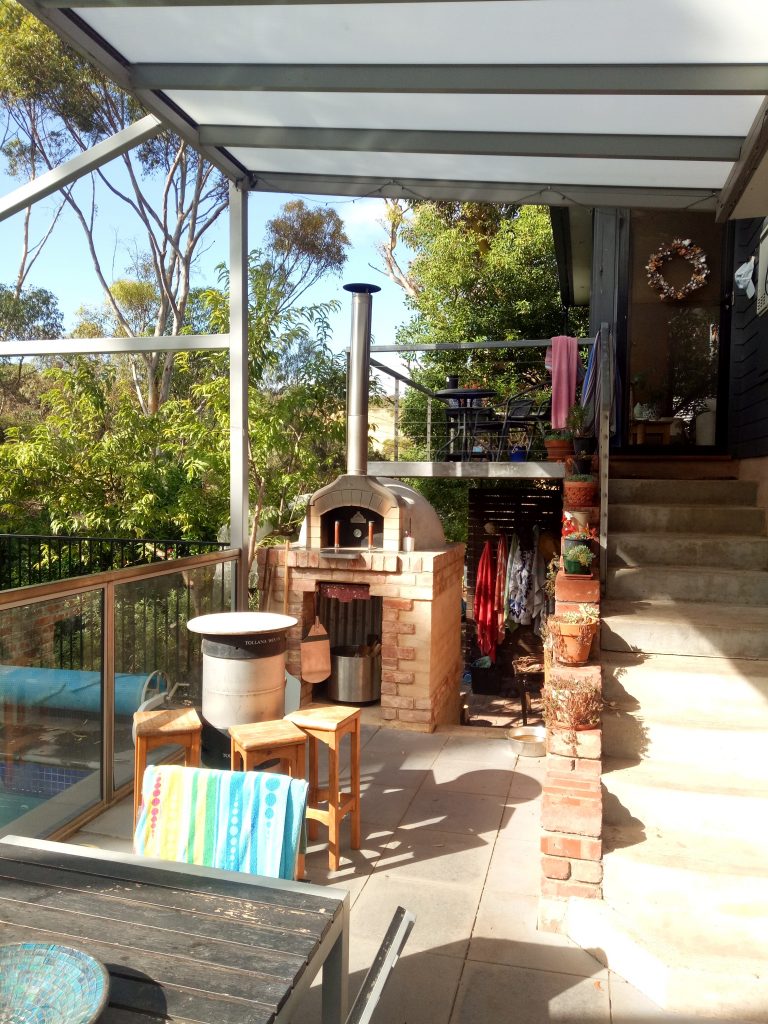
10 YEARS LATER
Ten years later: The Swimming pool alfresco area now fitted out with a Brick Pizza oven and a 10mm Polycarbonate roof in Aluminium framing. Pool-house roof and walls still to come….